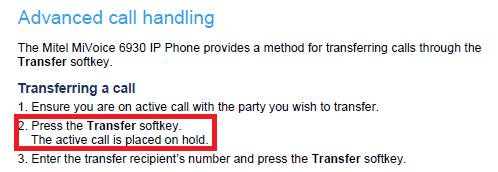
Below are the directions to transfer a call (blind transfer).
First you have to have an active call.
If you want to “announce the call” do not press the transfer key a second time (step 4) until after you’ve announce the call to part you’re transferring to.
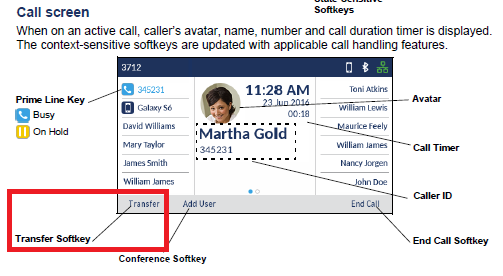
Attached is the quick reference guide for your phone. Most feature are soft features, no button like the old non-color display phone.
With our Mitel phone system when calling a non-District phone number using a Mitel desktop phone users are now required to first dial 9 (to get an outside line), then 1+Area Code+Phone number when making calls anywhere in the USA, this includes FAX lines, call forwarding, speed dials, etc. Example: 91xxx-xxx-xxxx
With our Mitel phone system when calling a non-District phone number using a Mitel desktop phone users are now required to first dial 9 (to get an outside line), then 1+Area Code+Phone number when making calls anywhere in the USA, this includes FAX lines, call forwarding, speed dials, etc. Example: 91xxx-xxx-xxxx
On 10/24/2021 there was a Mandatory 10-digit dialing change in 82 area codes nationwide. Callers must dial 10 digits when making calls within the area codes listed on the PDF.
Please do not move your Mitel desk phone yourself. If a campus phone is moved without the knowledge of ITS, the location data provided to 911 first responders will be inaccurate, potentially resulting in a life safety issue. Reach out to ITS by opening an online support ticket, emailing helpcenter@smccd.edu, or calling the ITS Helpdesk at 650-574-6543.
Click on the three dots on the top right corner of your screen.
Select “New Incognito Window” from the dropdown menu.
A new window will open indicating that you are in incognito mode. You can identify the private browsing mode by the icon that appears in the top corner of the window.
Click on the three horizontal lines on the top right corner of your screen.
Select “New Private Window” from the dropdown menu.
A new window will open indicating that you are in private browsing mode. You can identify the private browsing mode by the purple mask icon that appears in the top corner of the window.
Click on the three dots on the top right corner of your screen.
Select “New InPrivate Window” from the dropdown menu.
A new window will open indicating that you are in InPrivate browsing mode. You can identify the private browsing mode by the blue “InPrivate” label that appears on the top corner of the window.
Note that the exact steps may vary depending on the version of the browser you are using. If you’re still having trouble, you may want to try restarting your browser or submit a ticket to the ITS HelpCenter.
The following video and slides were generated by Victor Quintanilla as part of the “Zoom for Beginners” training. This post will be updated as more resources become available.
During the COVID-19 pandemic, network security has become more important than ever. In order to best protect our student, faculty, and staff data, the SMCCD GlobalProtect VPN now supports multi-factor authentication.
If you need a VPN connection to complete tasks that are necessary to for your role, please have your Dean or Vice President contact Aaron Soo to authorize the use of VPN.
Once you have been authorized, please see the following tutorial for assistance on getting started.
You will need a password to access this video, which Aaron will provide to you via email once you have been approved.
You have likely already used multi-factor authentication in the past when using online services such as online banking or email.
ITS recommends downloading OneLogin Protect for the fastest experience when using multi-factor authentication.
With the increased usage of Zoom to deliver content to our students, there has also been an increase in “Zoombombing”. Zoombombing means that uninvited guests attend your Zoom meeting without your knowledge which can cause significant interruptions.
Settings
Open your SMCCD Zoom Account and navigate to the “Settings” page under “Personal” in the navigation bar.
On the Settings page, please make sure that the following options are toggled correctly:
Join before host – OFF
Mute participants upon entry – ON
Private chat – OFF
File transfer – OFF
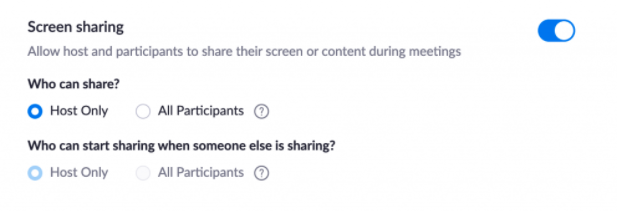
Screen sharing – ON with “Host Only”
Disable desktop/screen share for users – ON
Annotation – OFF
Remote control – OFF
Allow removed participants to rejoin – OFF
Waiting room – ON
Authentication Profile – ON
To better understand what each of the settings does within Zoom, ITS recommends reviewing each of the settings below.
Join before host
The participants could be having a party without you there to monitor.
Recommendation: Turn off
Mute participants upon entry
Barking dogs and crying babies can take over your meeting unintentionally. So can the participant who is singing their favorite heavy metal song at the top of their voice.
You might also consider disallowing participants to unmute themselves. In that case, participants can use the “Raise hand” feature or the chat room to indicate when they want to speak. You can manually unmute them.
Recommendation: Turn on
Private Chat
The chatroom is one of the key ways to get live feedback and participation with your participants. We want to see all the communication that is happening. Disabling private chat will help tamp down any possible bullying or harassment during your meeting. They can use discord or text messages if they need a backchannel.
Recommendation: Turn off
File transfer
The ability to send files to your participants is very handy for you. Not so helpful if the participants are sending inappropriate (even unintentionally) files/gifs/images to the group. Put your files on Dropbox, 3C Media, Google Drive, etc. and give them download links.
Recommendation: Turn off
Screen sharing
Your company department meeting is a great place for colleagues to share their business work with the group. Your classroom might not be. Participants can take over the session share and put anything they would like on-screen for all in attendance. You can make a participant a co-host if you would like someone else to share their screen.
Recommended: Turn on “Host Only”
Disable desktop/screen share for users
We don’t need to see the personal photos and information of your co-host when they share. This setting will enable them to share an Application (Powerpoint, Firefox, Chrome, Powershell, etc.) only. You should consider only sharing applications yourself.
Recommendation: Turn on
Annotation
Annotation gives you the ability to “draw” over the screen. It also gives that to your participants. They can draw anything that comes to mind over your presentation, your face, or anything else.
Recommendation: Turn off
Remote control
This is a handy support feature in a 1:1 session. You don’t want participants constantly requesting remote control of your desktop during meetings.
Recommendation: Turn off
Allow removed participants to rejoin
When you kick someone out of your meeting for any reason, they shouldn’t be able to come back.
Recommendation: Turn off
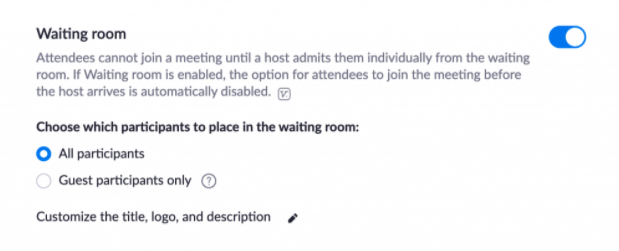
Waiting Room
This is perhaps the most useful feature to help control your meeting or classroom. All participants will enter the waiting room before joining the main session. This allows you to let participants in as you are ready to receive them.
Recommendation: Turn on and customize
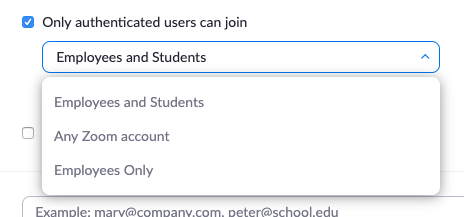
Authenticated Users
Authentication profiles, allow hosts to restrict participants who can join a meeting or webinar to those who are logged into Zoom, and even restrict it to Zoom users who’s email address uses a certain domain.
If a participant tries to join the meeting or webinar and is not logged into Zoom, or logging in with the specified email domain, they will receive the following message:
In the Education Cloud Keynote at Dreamforce 2019, CTO Daman Grewal and Vice President of Planning, Research and Institutional Effectiveness Karrie Mitchell spoke about San Mateo’s Salesforce implementation. The following film, premiered during the keynote, highlights the impact Salesforce will have on student success across our District.
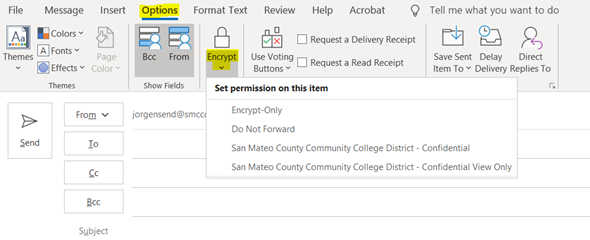
In the email message, choose Options, select Encrypt and pick the encryption that has the restrictions that you want to enforce, such as Encrypt-Only or Do Not Forward
You can send this encrypted message to other employees with the same Outlook version or higher.
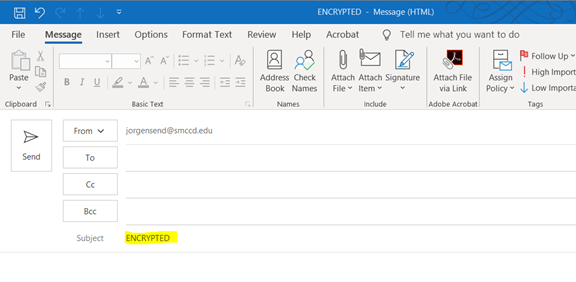
Alternatively, you can use the word “ENCRYPTED” in the subject line of your email. This is a workaround for various Outlook version issues. This works on Windows & Macs.